
Before I discovered my passion for fly fishing, I was a diehard spinner fisherman. A diehard is defined as “a person who strongly opposes change or who continues to support something in spite of opposition.” For me back then, the ‘opposition’ was the world of fly fishing itself. I was quite content with spinner fishing’s relative simplicity. And to be completely honest, nearly everything I witnessed and understood about fly fishing was overwhelming. From complex knots and high-tech gear to intricate casting and line control, I struggled to grasp the notion of converting from spinner to fly. Thankfully, I had some generous friends ease me into the transition, taking me out on the water and explaining the basics of the sport. But when I attempted to go out on my own, I barely made it past setting up my rod and rigging my line.
Without getting into the long and frustrating process I went through (and damn near all novice fly fisherman encounter) to overcome those initial obstacles, I will just say this. There are a handful of simple and useful tricks to make rigging up much easier. Below, I’ve outlined some of the tactics and tips I’ve gathered from my own experience as well some from fellow anglers. If you repeatedly practice these insights, you will expedite your pre-game procedures and find yourself fishing more and fumbling less.
Setting Up Your Rod
Given their length and fragility, being able to break your rod down for transportation and storage is key. That’s why manufacturers have created rods that come in sections, with the four piece setup being the modern standard. Each section connects at a joint called the ferrule. Essentially, one end of the ferrule is the female or socket segment and the other end is the male or plug connection.
 When assembling your rod, start with the thickest (handle and reel seat end) section and add the next largest piece onto it. Bring the two sections together at a slight angle to each other, using the fly line guides as a reference. Once the two pieces are fully seated, twist them until the guides are perfectly aligned. This ensures a sturdy connection that will not separate while casting. Many rod manufacturers have added dot indicators to each piece to help with proper alignment. Repeat these steps with the other sections.
After your rod is fully assembled, attach your reel and strip out the entire leader and about ten feet of fly line. The tip (small end) of your leader will be tiny. Instead of trying to feed that minuscule thread through each of your guides, grab your fly line instead. Fold it over in your fingers creating a bow or half circle. Then insert the line (convex end) through the guide with one hand and pull it through with your other hand. Not only will you have more purchase with the folded fly line but you will also decrease the chances of all your line falling back through the guides if you happen to lose your grip.
Rigging Up Tippet
With your rod assembled and fly line & leader fed through the guides, it’s time to tie on some tippet. Now, the next few steps in the rigging process will go a lot smoother if you’ve already practiced tying both the clinch and double surgeon’s knots. No worries if you haven’t. You’ll be getting plenty of repetition with that process soon enough.

For the beginner fly fisherman at this juncture, I would suggest using a tippet ring*. In doing so, you can focus your initial knot knowledge to just the clinch. When you purchase a set of RIO tippet rings from Vail Valley Anglers, they come on a handy holder. Separate one ring from the group but keep it on the open-ended shaft of the caddy. The ring is much more manageable this way. Now, feed the end of your leader through the ring. The entire holder spins so making your 5-8 wraps is quite easy. Finish your clinch knot and remove the ring from the shaft with your leader tip fully secured. After you tie your tippet onto the other side of tippet ring using another clinch knot, you’ll be ready to attach your (first) fly.

When finishing a clinch or double surgeon’s knot, always remember these two important steps. First, before pulling your knot tight, add some lubricant to the line. Your saliva is an easy and readily available option. This prevents any unnecessary abrasion to the tippet or leader that can occur when the two parts of line cinch down on each other. Secondly, always test your knots. Grab the two ends of the line and give them a generous yet gradual pull. Make sure there isn’t any slippage.
*For more information about why and how to use tippet rings, check out our blog on the subject here.
Rigging Flies and Indicator
From this point on, your rigging approach will vary based on what type of fly you intend to use. But for the sake of simplicity, I’ll keep this discussion focused on nymph setups. Also, roughly 90% of trout’s diet consists of food sources found below the surface of the water. So having a firm grasp of nymph rigging will always come in handy.
With about 12-20” of tippet tied to your tippet ring, select your fly and attach it with another (you guessed it) clinch knot. In the state of Colorado, you can legally fish with up to three flies at a time. But if you are just getting into the sport, it may be wise to begin with just one fly. For starters, you’ll avoid some rather unpleasant rat’s nests when getting tangled. And secondly, switching out your flies is much easier when you only have to do one at a time. On the other hand, once you get comfortable with rigging and casting, using two flies will drastically increase your chances of hooking up.
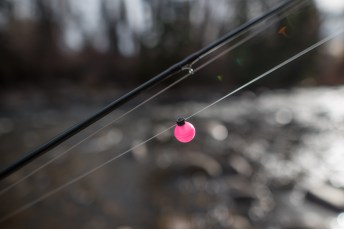
Strike indicators are a great tool for nymphing, especially for beginners. Currently, there are a dozen or so different styles to match each angler’s individual approach. But for me, the Air-Lock indicators are hard to beat. They are easy to adjust, come in a variety of sizes and colors and they won’t dent or fray your leader. As for where to attach them, the rule of thumb is 1.5 times the depth of the water you are fishing. But there are countless exceptions to that standard. Mainly, it comes down to adjusting your depth based on where the fish are feeding in the water column.
*For more information about fishing with two flies, check out our blog on the subject here.
Tying on Small Flies
Most of the terminal tackle involved in fly fishing is small. Some tippets and flies are seemingly microscopic. This presents several challenges when handling these items while rigging up. Here are three quick tips to help you manage and tie-on the most minute flies and keep your sanity while doing so.

- Use your hemostats (forceps/pliers): We all know that hemostats are an indispensable tool for removing hard to reach hooks from a trout’s mouth. But they are also great for handling and tying on small flies. The trick is simple. Just grasp and lock the bend of the hook with your forceps. Now you have more articulation, space and mobility to feed line thru the eyelet and complete your knot.
- Pierce your eyelets first: Many times over, I’ve sat and tried to get my tippet through the eye of a hook only to realize that it’s totally clogged with head cement (an adhesive used in the fly tying process). Avoid this dilemma and pierce those suckers right off the bat. Most nippers have an eye cleaning point attached on the back end. Or you can just use the point of the hook from another fly.
- Cut tippet at sharp angles: Struggling to get your tippet through the eye of a #24 fly? By cutting your tippet at a sharp angle, you will form a tiny point. This makes feeding your line through the eye much easier. Save yourself even more time by cutting your tippet like this directly from your spool.
Practice, Practice, Practice
Even with all of these tips and procedures laid out, the only way you will get more proficient with rigging is through practice. And lot’s of it. Thankfully, it’s inevitable and mandatory with each fishing excursion. But be ready for some initial failures. Frustrations will arise. Cursing will floweth from thine mouth. But don’t succumb to breaking your rod in half or throwing it in the river. Keep at it. You will soon realize that the rewards far outweigh the tribulations.
Want the ultimate introductory course to fly fishing where you’ll review these tips and so much more? Check out our blog on the CMC Intro to Fly Fishing course here.
Keep ‘em wet, handle them sparingly and always appreciate where you are.
Seth Kulas, Vail Valley Anglers Content Writer, @sticks2snow


